One Missed Step in Waterproof Testing, an Entire Batch Scrapped: The Real Dilemma Faced by GPS Tracker Manufacturers!
I. Risks of Poor Sealing
In 2024, a manufacturer failed to carry out systematic leak testing during the mass production of GPS trackers and relied solely on visual inspection before releasing the products to the market. During actual use, due to inadequate enclosure sealing, circuit board corrosion and component failure occurred. In the short term, issues such as unstable positioning signals and frequent disconnections appeared , and later led to a large number of devices becoming completely inoperable. Ultimately, the manufacturer faced large-scale repairs and replacements, resulting in direct economic losses and serious damage to brand reputation and market partnerships .
 Fig. 1: Scrapped GPS trackers
II. Why Do GPS Trackers Require Leak Testing?
Generally speaking, any GPS tracker with requirements for waterproofing, dustproofing, or long-term stability should undergo leak testing . As electronic devices that are exposed to complex environments for extended periods, leak testing is a critical process to ensure stable quality. For end users, choosing trackers that have passed strict leak testing means lower failure rates and longer service life.
| Waterproof and Dustproof Protection | GPS trackers are widely used in outdoor environments, vehicles, logistics containers, pet collars, and other demanding scenarios, where they may be exposed to rain, dust, mud, and sand. Leak testing ensures the enclosure sealing level meets requirements, preventing the ingress of moisture and dust. |
| Prevent Moisture and Corrosion of Electronic Components | Trackers contain precision circuits, batteries, communication modules, and other components. If sealing is inadequate, moisture in the air can gradually penetrate, leading to PCB corrosion, component oxidation, battery leakage or performance degradation, and antenna signal attenuation, directly reducing accuracy and service life. |
| Adaptation to Extreme Temperatures | Devices may experience high- and low-temperature cycles during use (such as high temperatures inside vehicles in summer and low temperatures in winter). Good sealing prevents moisture or contaminants from being drawn in due to the “breathing effect” caused by thermal expansion and contraction. |
| Improved Durability | GPS trackers are typically required to operate continuously for long periods and may remain maintenance-free for years. Rigorous leak testing can identify assembly defects in advance, preventing gradual leakage-related failures during use and reducing after-sales repair rates. |
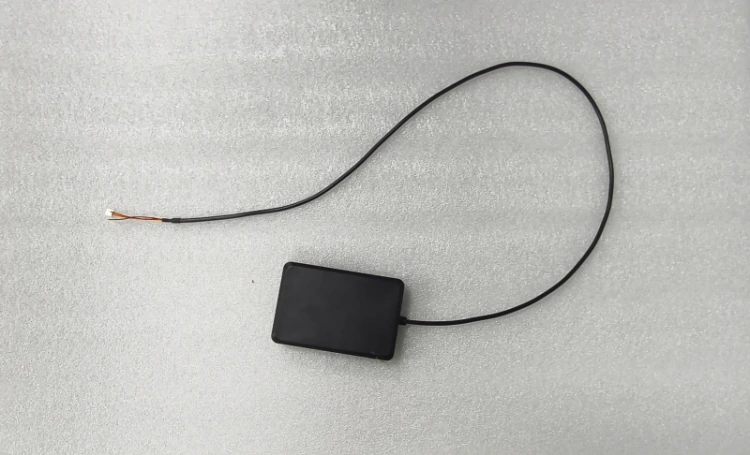 Fig. 2: GPS tracker sample provided by the customer
III. Solution Concept
Leak testing of GPS trackers involves testing the entire assembly, including the enclosure, cable entry points, and connectors. It requires custom-designed fixtures that match the product shape to seal the entire tracker before pressurizing it for testing.
IV. Testing Challenges
The connector area also needs to be leak tested. Ensuring smooth and efficient loading and unloading of fixtures without complexity is a key consideration for technicians when designing the fixture.
Solution: Design a small dedicated section to accommodate the connector and cover it with a piece of soft rubber. This allows the connector to be tested while ensuring sealing performance and ease of operation.
 Fig. 3: Fixture used for sealing and pressurization
V. Final Product
Based on the customer’s GPS tracker, a dedicated GPS tracker leak tester was developed. The instrument used is the WAFU Brothers Multifunction Leak Tester , which supports customization to meet various customer requirements. It offers high testing accuracy, fast testing speed, and a wide testing range.
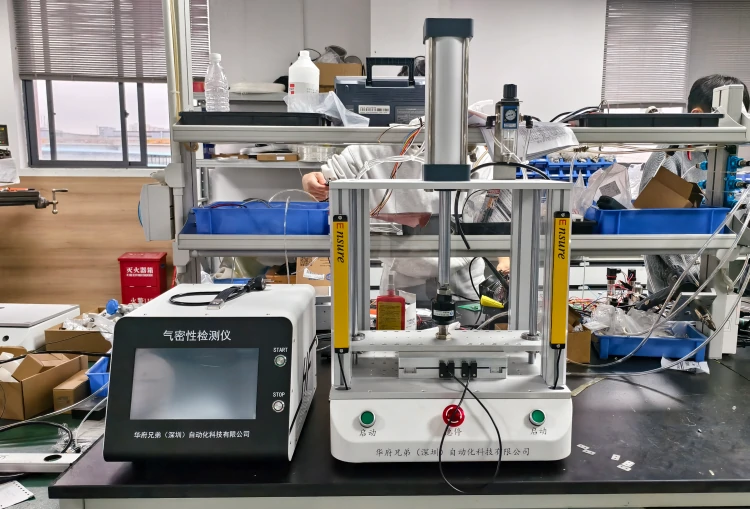 Fig. 4: Leak tester for GPS trackers
VI. Testing Procedure
The test requires an IP68 waterproof rating. A positive pressure method is used, with a test pressure of 200 kPa and a maximum allowable leakage of 100 Pa.
- 1. Place the product into the contoured cavity of the fixture, positioning the connector in its designated slot.
- 2. Press both start buttons simultaneously, or press the start button on the right side of the instrument to activate the test program.
- 3. The upper fixture automatically descends to seal the product, after which test gas is introduced into the product.
- 4. The test process consists of four stages: pressurization, pressure holding, testing, and exhaust.
- 5. After testing, the result (PASS/FAIL) is displayed on the screen, and the fixture indicator lights illuminate simultaneously. For failed products, a buzzer alarm can be triggered.